Secrets from the Pros
When you see those mouthwatering photos from Holland, ever wonder how the pros do all that? Well, there a few things they do and most of us don’t. It’s amazing how easy it is to plant bulbs like a pro.
1. Plant them close together, not spaced out!
Nothing’s more disappointing than lonely tulips or daffodils feet apart. Don’t do it! It’s not a matter of cost; it’s a matter of understanding how they’ll look next spring. I plant my tulips about 3 inches apart. That makes them look like a luscious “drift’ of color, even it’s just a dozen or so of each color. Resist your habit of spacing with bulbs; they grow quickly to full size. Then they don’t spread out or keep getting bigger like the seeds or young perennials you plant!
2. Pay attention to bloom times.
“Early Spring and “Late Spring” mean what they say. An “Early double” tulip will not look good next to a bunch of “Late Spring” ones. In fact they won’t even be next to each other, since they bloom weeks apart. Use these differences to create your tulip show, not detract from it. It’s really easy.
3. “Stack” your bulbs.
What? Yes, here’s a secret even many experts don’t know. You can plant more than one type of bulb in any spot in the garden, or even in a big pot. You simply plant them in layers, like a layer cake. Here’s how:
First, choose one bulb that requires deep planting, like a tulip. Plant them at the bottom of your dug out space that you’ve dug to about 4” deep. Then toss in an inch or so of soil over them, and then plant a second type, right on top. Maybe our “Miniature Bulb Mix.” They only need about a 2” planting depth; put them in, and fill up the hole to the top and press the soil down.
In spring you’ll have the tulips growing right up through the miniature tulips and when they’re all in bloom, you’ll have your tall tulips in all their glory growing right out a jewel-colored “ground cover” of miniature bulbs in bloom, too. Imagine a big pot filled with pristine tall white tulips, with a sparkling multicolored ground cover below. Fantastic!
You can make up your own combinations. Just carefully check the heights of the full- grown flowers, and the depths of planting for each. How about Double Early Tulips growing tall over crocus? Or tall daffodils over luscious blue Grape Hyacinths? (Like in the photo below.) Your neighbors will think you’re a true expert!
4. Don’t plant rows. Plant “drifts.”
Take a look at the luscious photo below of a “river” of Grape Hyacinths flowing through Daffodils. See how the edges of each group are “free-form,” never straight? Each type bulb and each color forms a “drift,” and that’s what you want. (Be sure bloom times match.) And notice how important it is to have the blooms close together to have this look.
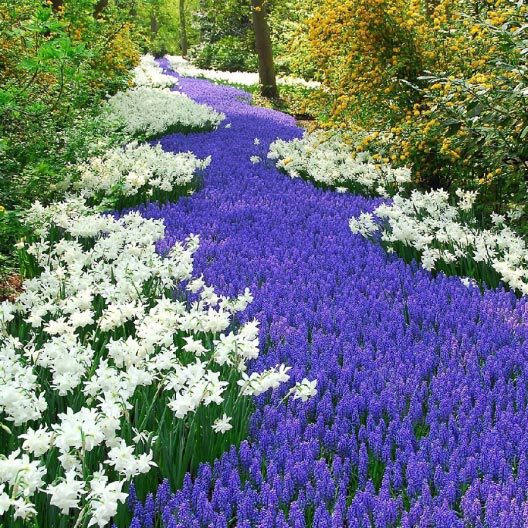
5. Don’t plant all the same. Plant contrasts.
The photo above says it all. The blue is a great contrast against the tulips. Red and yellow work the same way. And everyone loves drifts of Queen of the Night, the black tulip, against a drift of pure white ones.
6. Don’t dig all those holes. Dig a ditch.
If you’re lucky enough to be planting your bulbs in good loose soil, this is the easy way to make them look great. Don’t bother to dig individual holes. Just take a shovel and take out all the dirt in the planting area, down to the depth you want for what you’re planting. Then just press the bottoms of your bulbs in the bottom (close together!) and then just shovel the soil back in and walk on it to pack and firm the soil. Less work, and much better results, I promise.
2 thoughts on “Secrets from the Pros”
Comments are closed.
How do I maintain a wildflower garden. I planted the southeastern wildflower mix last fall. Do I need to mow over wildflower bed this fall or just let it be? I have had advice for both ways.
HI Dora: Good question. Of course, nobody mows down the wildflowers in the wild, so it’s not required. But we do recommend a fall mowing for two reasons. First of all, it removes the dying down flowers, creating a nice neat look for winter. And when spring comes, your perennial wildflowers come up green and new, without the unsightly dead stalks from last year. Just set your mower on a high setting so you don’t scalp the crowns of the plants, or use a weed whacker.
The second reason is not just cosmetic. Remember, wildflowers “go to seed” as winter approaches. So when you cut them down, your activity sends the seed flying down to the soil, where they need to be to germinate next spring and create more flowers for your meadow. So get out there on a crisp late fall day, and flatten the meadow. It’s very little work, and in fact, and you don’t even have to rake up the mowings. I always recommend leaving them on the meadow for a winter mulch.
Glad you’re enjoying your wildflowers!